Renowned makeup artist Kevyn Aucoin once said that contouring “is all about dimensions. It’s about highlighting and deepening certain areas of the face for more drama and definition.” Through contouring, Aucoin worked his magic on countless Hollywood faces, chiseling cheekbones and reshaping facial features with ease—but highlighting and contouring can take some time to master. That’s why we’re sharing how to apply highlighter and contour with a simple step-by-step guide.
The Benefits of Contouring
Contouring uses darker tones to sculpt your facial features and enhance your face shape. You can use contour to slim the face all over or define key areas like the nose, cheekbones, hairline or jawline. When used with highlighter, contour can accentuate your bone structure or even reshape the look of certain features as you please.

How to Apply Contour
Just getting started? Here’s how to contour using TEMPTU’s Perfect Canvas Airbrush Bronzer & Contour airpod formulas.

Step #1: Apply primer & foundation
Before contouring, prep your skin with primer followed by foundation. Using our airbrush gun, apply your TEMPTU foundation on Speed Setting 2 to even out your complexion and conceal any areas of discoloration.
Pro Tip: TEMPTU Perfect Canvas Airbrush Bronzer & Contour can actually be applied under or over airbrush foundation. In fact, we recommend applying it before foundation on fair to light skin tones for a softer, more natural look.
Step #2: Contour your face.

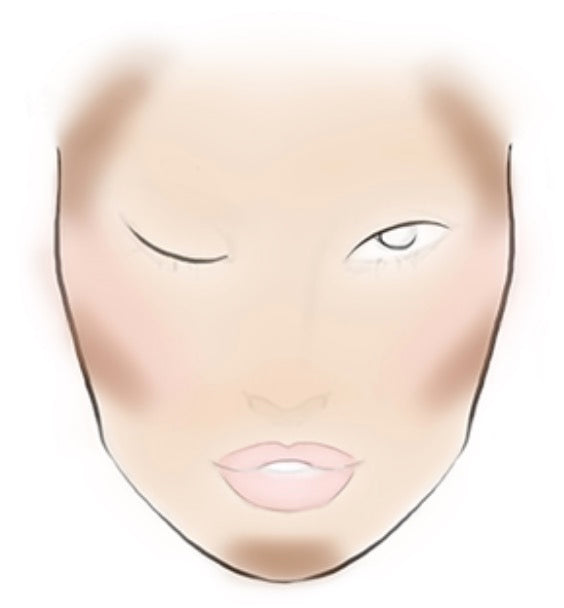
The key to applying contour is knowing where it should go — and that ultimately depends on your face shape.
Using the TEMPTU Air on Speed Setting 2, you can apply our Perfect Canvas Airbrush Bronzer & Contour beneath the cheekbones to enhance your angles, on the sides of your nose for a slimming effect or along the jawline and hairline to frame your features.
Think of the process as tracing either the number 3 or the letter C on each side of your face and then contouring the nose as needed. Small foreheads or strong hairlines should not be made to look even more compact with contouring, so tracing the letter C is a better option for those who have a petite forehead space.
Our bronzer & contour is shimmer-free for a more natural finish, and its buildable shade of warm taupe is designed to contour all skin tones.
Pro Tip: When contouring, always move in small circular motions to avoid harsh lines.
Step #3: Apply highlighter.
When it comes to enhancing your facial features, highlighting and contouring are the ultimate dream team. Essentially opposites of one another, contour darkens specific areas of the face while highlighter brightens key areas with a subtle sheen.
Apply highlighter to the high points of the face where light would naturally hit (the center of the forehead, down the bridge of the nose, the tops of the cheekbones and the chin).
Pro Tip: You can either use TEMPTU’s Perfect Canvas Airpod Highlighter or a TEMPTU foundation shade that’s one or two shades lighter than your main foundation.
Step 4: Add blush.
Once you’ve applied your contour and highlighter, apply our Perfect Canvas Airpod Blush to the apples of your cheeks. Doing so adds a healthy flush of color to the skin for a more natural finish.
Pro Tip: Smile while applying blush to lift the color higher on the face.