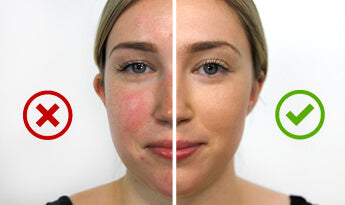
How To Recognize, Avoid and Correct Airbrush Accidents Airbrushing isn’t rocket science, but it isn’t a walk in the park either. Silly analogies aside, learning how to properly apply airbrush makeup requires a trial, experimentation, or a short tutorial. After all, years of playing with the products in mom’s vanity table eventually made us pros: well versed in compacts, blush and eye shadow pallets. (Did anyone else rock blue eyelids back in the day? …No? Just us?) In most cases, the point of applying makeup is to enhance our looks – not hinder them. While some people are organically skilled at achieving the natural look airbrush makeup provides (read: they crush it on their first time), others do not. Here are a few tips and tricks to create a flawless look – ahem, a guide for the rest of us. Color Selection It’s important to be mindful of your skin tone while selecting and applying airbrush (or any) makeup. In real life, most people test a small patch along the jaw and neckline – which is par for the course. But, before settling on that shade, you should airbrush half your face in one shade, and then choose the shade next to it and test that on the other half of your face. This way, you can see which color makes you look more warm and alive. You never want to look washed out. Prep With Primer Don’t overlook the stages of pre-applying makeup. Before using foundation, establishing a starting point is key. Our Base Smooth and Matte Primer helps makeup last longer while simultaneously diffusing imperfections and combatting shine. You’ll need to lay the groundwork, and this does just the trick. Apply On With A Plan Once your color is confirmed, and primer is set, apply Airbrush Foundation in slow steady circles, gently pulling back on the SoftTouch control. This should be done while holding our TEMPTU Air device 4-6 inches from the face. The method that makes the most sense? Stop and repeat, working in thin layers. Apply on one cheek while the other dries; move to the forehead and then onto the center of the face. Of course, just like any other foundation, be careful not to over-layer the makeup on your face! (That’s a big no-no.) Cover Up Imperfections Don’t over compensate when you’re looking to cover up. When airbrushing around your nose and concealing unwanted blemishes, pull back on the trigger with less pressure for a slower spray. This can be completed while moving in closer to the face: about 1 inch away. By tilting your hand to different angles, you’ll achieve even coverage around raised areas. If you can’t prevent pesky pimples, you can hide them and avoid bringing more attention to signs of stress (sigh!) With these simple steps, avoid the awkward trial and error of airbrush mistakes. With a few tips, you’ll find your routine simplified and successful in no time!